> ## Documentation Index
> Fetch the complete documentation index at: https://docs.mage.ai/llms.txt
> Use this file to discover all available pages before exploring further.
# Mage Pro Version Control
> Connect Mage Pro to GitHub, Bitbucket, GitLab, or Azure DevOps using OAuth, HTTPS+PAT, or SSH. Manage data pipelines with Git and deploy commits to your cluster.
export const ProOnly = ({button = 'Get started for free', description = 'Try our fully managed solution to access this advanced feature.', source = 'documentation', title = 'Only in Mage Pro.'}) => ;
export const ProButton = ({href, label = 'Get started with Mage Pro for free', source = 'documentation'}) => ;
Mage Pro's version control workflow has three parts:
1. **Authentication** — [Connect your Git host](#1-authentication) to Mage (OAuth with GitHub, Bitbucket, GitLab, or Azure DevOps; HTTPS with a personal access token; or SSH). You do this in the **Deployments** app, but it also enables the [Version control terminal](#3-version-control-terminal).
2. **Deployments** — [Deploy](#2-deployments-app) commits to your Mage Pro cluster or workspace from the visual Deployments app.
3. **Version control terminal** — [Run Git in the browser](#3-version-control-terminal) (push, pull, branches) once you are connected.
## 1. Authentication
**Authentication is shared** by the [Deployments app](#2-deployments-app) and the [version control terminal](#3-version-control-terminal). Configure it in **Deployments** → open **Connect repository** or deployment **Setup** → **Connection** → **Authentication type**. Until this is set up, you cannot use Git-based deployment or the terminal.
Mage Pro supports three **authentication types**:
| Type | When to use |
| --------------- | ---------------------------------------------------------------------------------------------------------------------------------- |
| **OAuth** | Default path: sign in with GitHub, Bitbucket, GitLab, or Azure DevOps and pick org/workspace, repo, and branch from the UI. |
| **HTTPS + PAT** | Your organization requires a **personal access token** instead of OAuth, or you use a provider / URL where OAuth is not an option. |
| **SSH** | You use **deploy keys** or user SSH keys and `git@…` (or `ssh://`) remotes. |
If you change authentication type, **save authentication settings** before continuing with the rest of the connection configuration. Switching types clears the credentials from the other method in your deployment settings.
### Open the connection UI
From the Home page, select **Deployments** in the left-hand navigation menu to access the Deployments interface.
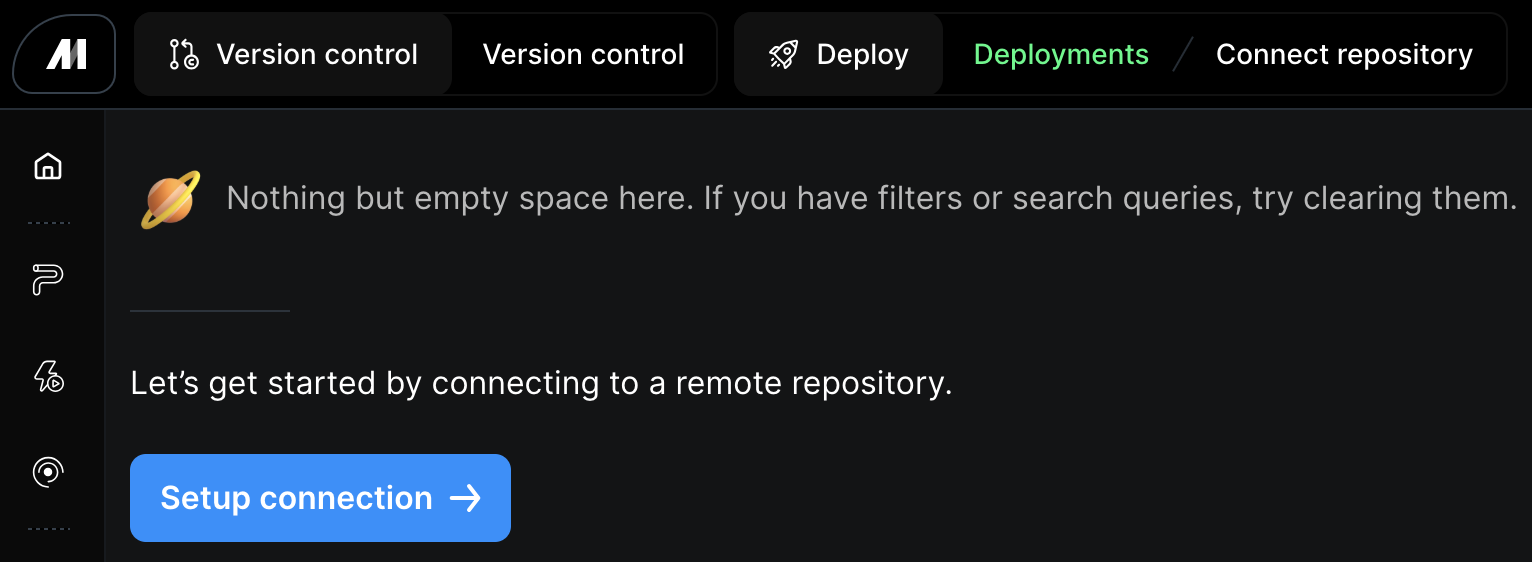
Click the **Setup connection** button to begin syncing with your code repository.
Mage Pro provides two main applications for version control and deployment:
1. **Deployments App**: Deploy code from Git commits to your Mage Pro cluster
2. **Version Control Terminal**: Push/pull code and manage branches using Git commands
## 1. Deployments App
The Deployments App is your primary tool for deploying code from Git commits to your Mage Pro cluster. It provides a visual interface for managing deployments across different environments.
### 1.1 Authentication
First, authenticate with your Git provider in the Deployments application to enable version control and deployment features.
#### Access Deployments
From the Home page, select **Deployments** in the left-hand navigation menu to access the Deployments interface.
Click the Setup connection button to begin syncing with your code repository.
 ### Project settings
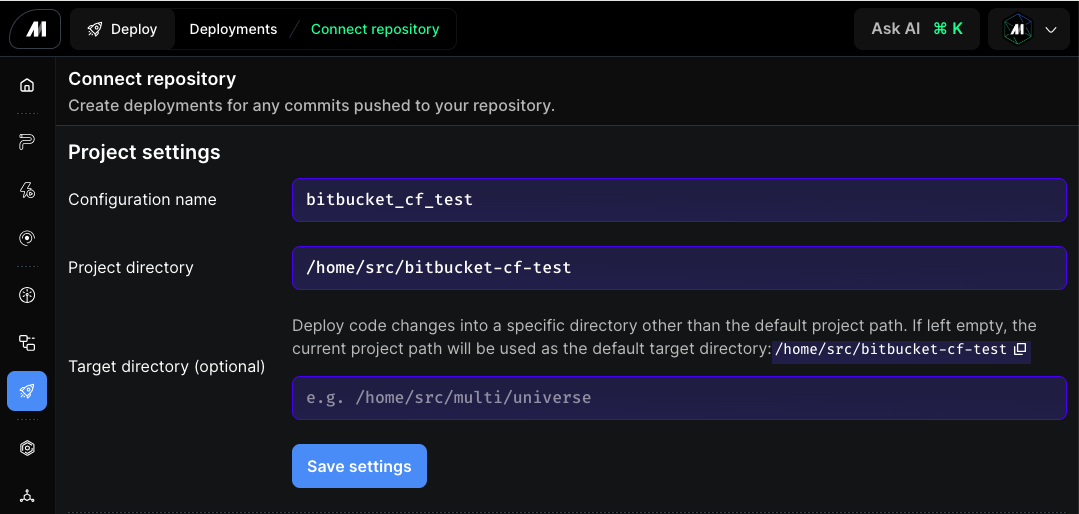
Fill in the **Project settings** fields at the top of the Connect repository page, then click **Save settings** before configuring authentication below.
* **Configuration name** — a label for this deployment configuration.
* **Project directory** — the user code path for your project. The default in Mage Pro is `/home/src/default_repo`. If you changed the `USER_CODE_PATH` environment variable in the Mage Cloud Management Portal, set this field to match.
* **Target directory (optional)** — the directory code changes are deployed into. If left empty, the project directory is used. For a nested repository you may want to set this to `/home/src`.
#### Configure Repository Settings
Once you are in the connect repository UI, take the following steps:
**Step 1**: Set your directory as the user code path you intend to use for your project.
* In Mage Pro the default directory will be **`/home/src/default_repo`**.
* If you changed the **`USER_CODE_PATH`** environment variable in the Mage Cloud Management Portal, your directory will need to reflect that change.
**Step 2 (optional)**: Set your target directory for your deployment if it will be different from your top level directory.
* If you have a nested GitHub project, you may want to set the target directory to `/home/src`
### Project settings
Fill in the **Project settings** fields at the top of the Connect repository page, then click **Save settings** before configuring authentication below.
* **Configuration name** — a label for this deployment configuration.
* **Project directory** — the user code path for your project. The default in Mage Pro is `/home/src/default_repo`. If you changed the `USER_CODE_PATH` environment variable in the Mage Cloud Management Portal, set this field to match.
* **Target directory (optional)** — the directory code changes are deployed into. If left empty, the project directory is used. For a nested repository you may want to set this to `/home/src`.
#### Configure Repository Settings
Once you are in the connect repository UI, take the following steps:
**Step 1**: Set your directory as the user code path you intend to use for your project.
* In Mage Pro the default directory will be **`/home/src/default_repo`**.
* If you changed the **`USER_CODE_PATH`** environment variable in the Mage Cloud Management Portal, your directory will need to reflect that change.
**Step 2 (optional)**: Set your target directory for your deployment if it will be different from your top level directory.
* If you have a nested GitHub project, you may want to set the target directory to `/home/src`
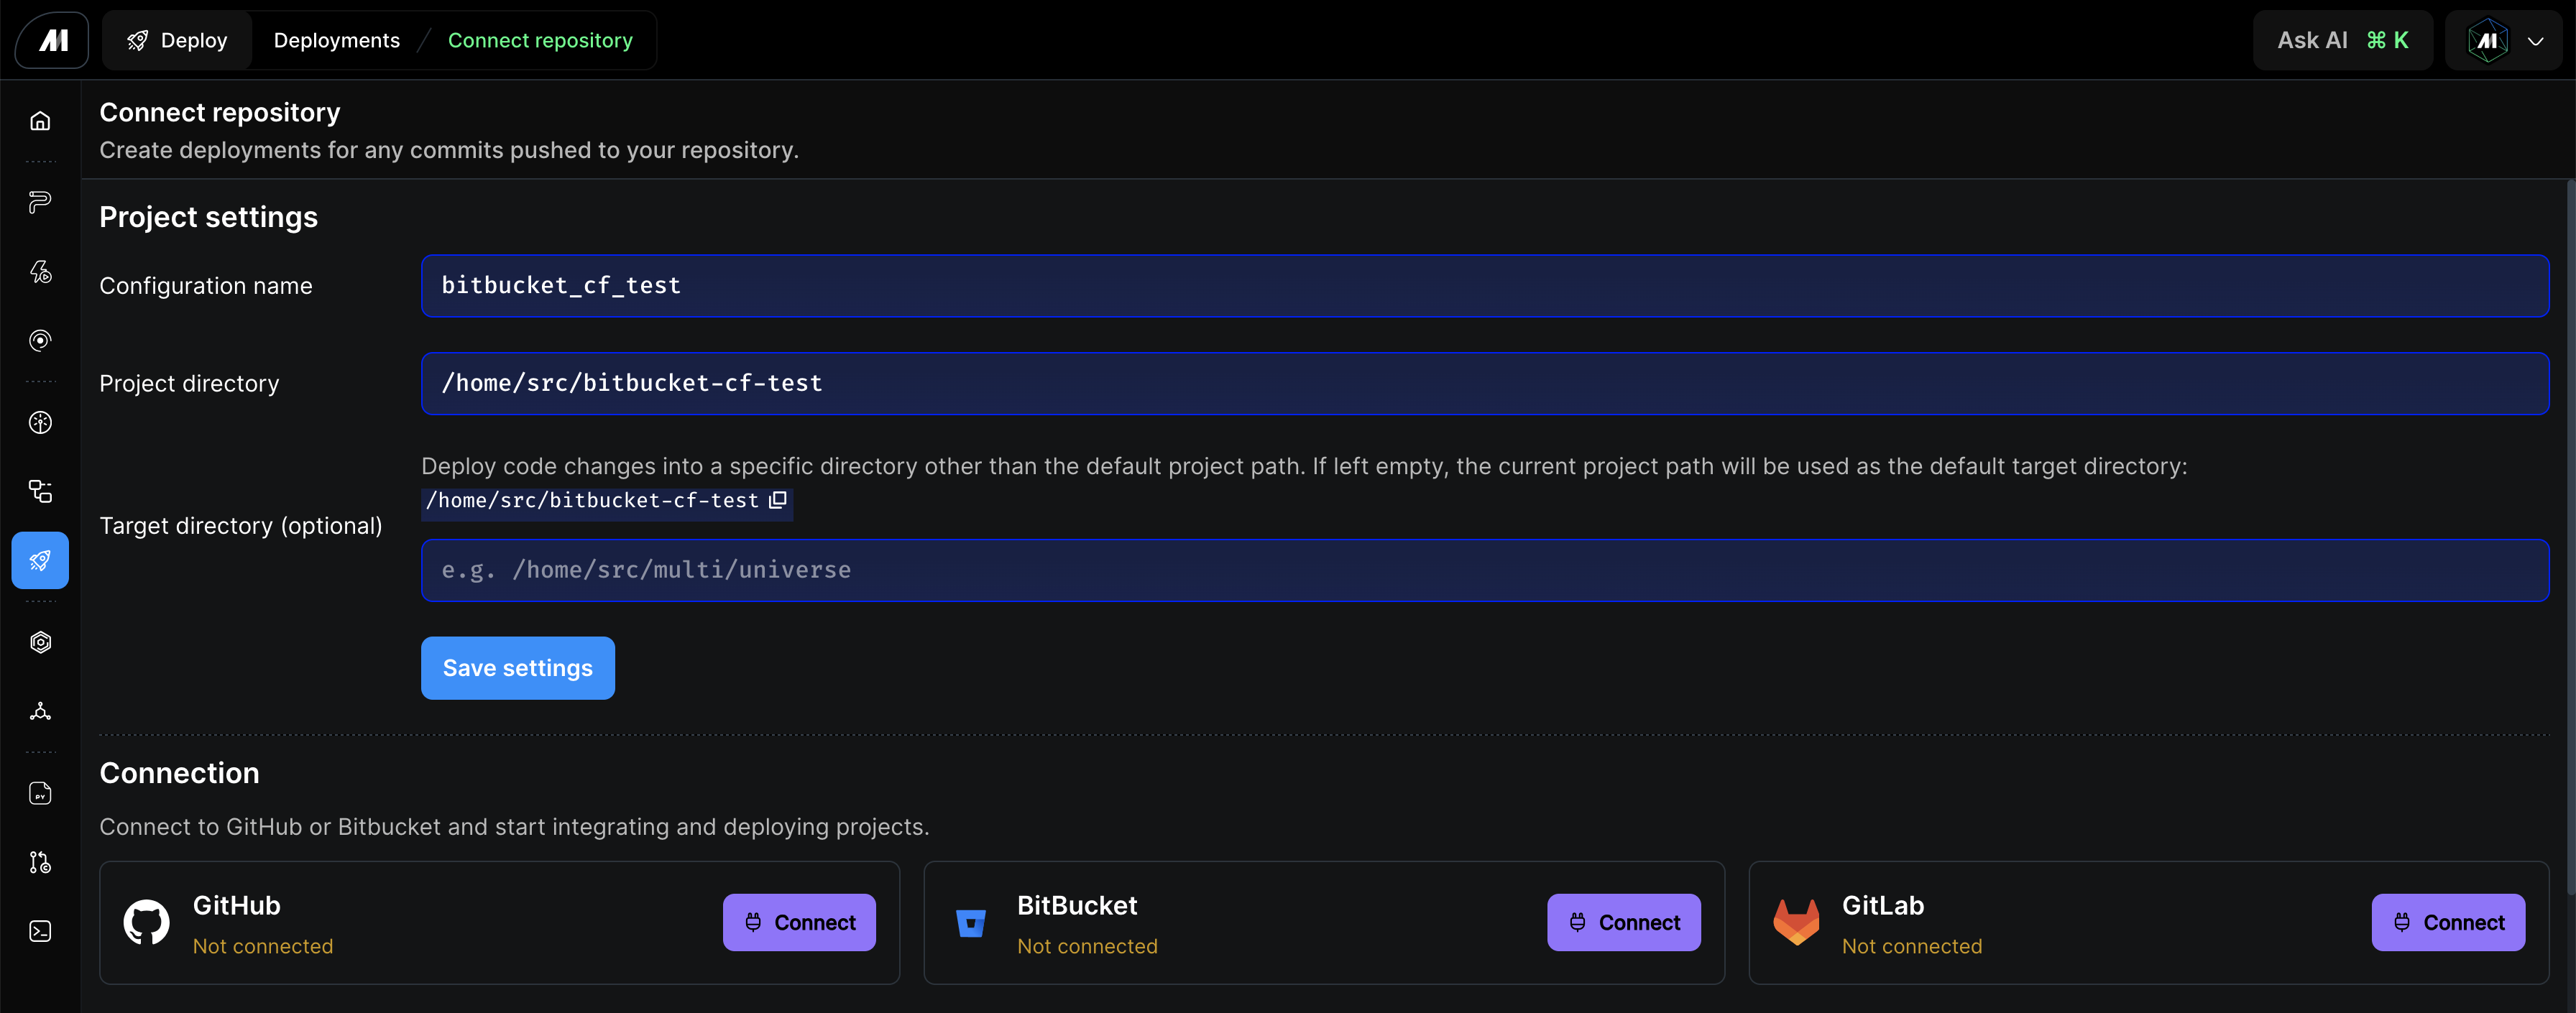 After clicking **Save settings**, proceed to the **Connection** section below to set your authentication type and connect your provider.
### HTTPS and personal access token (PAT)
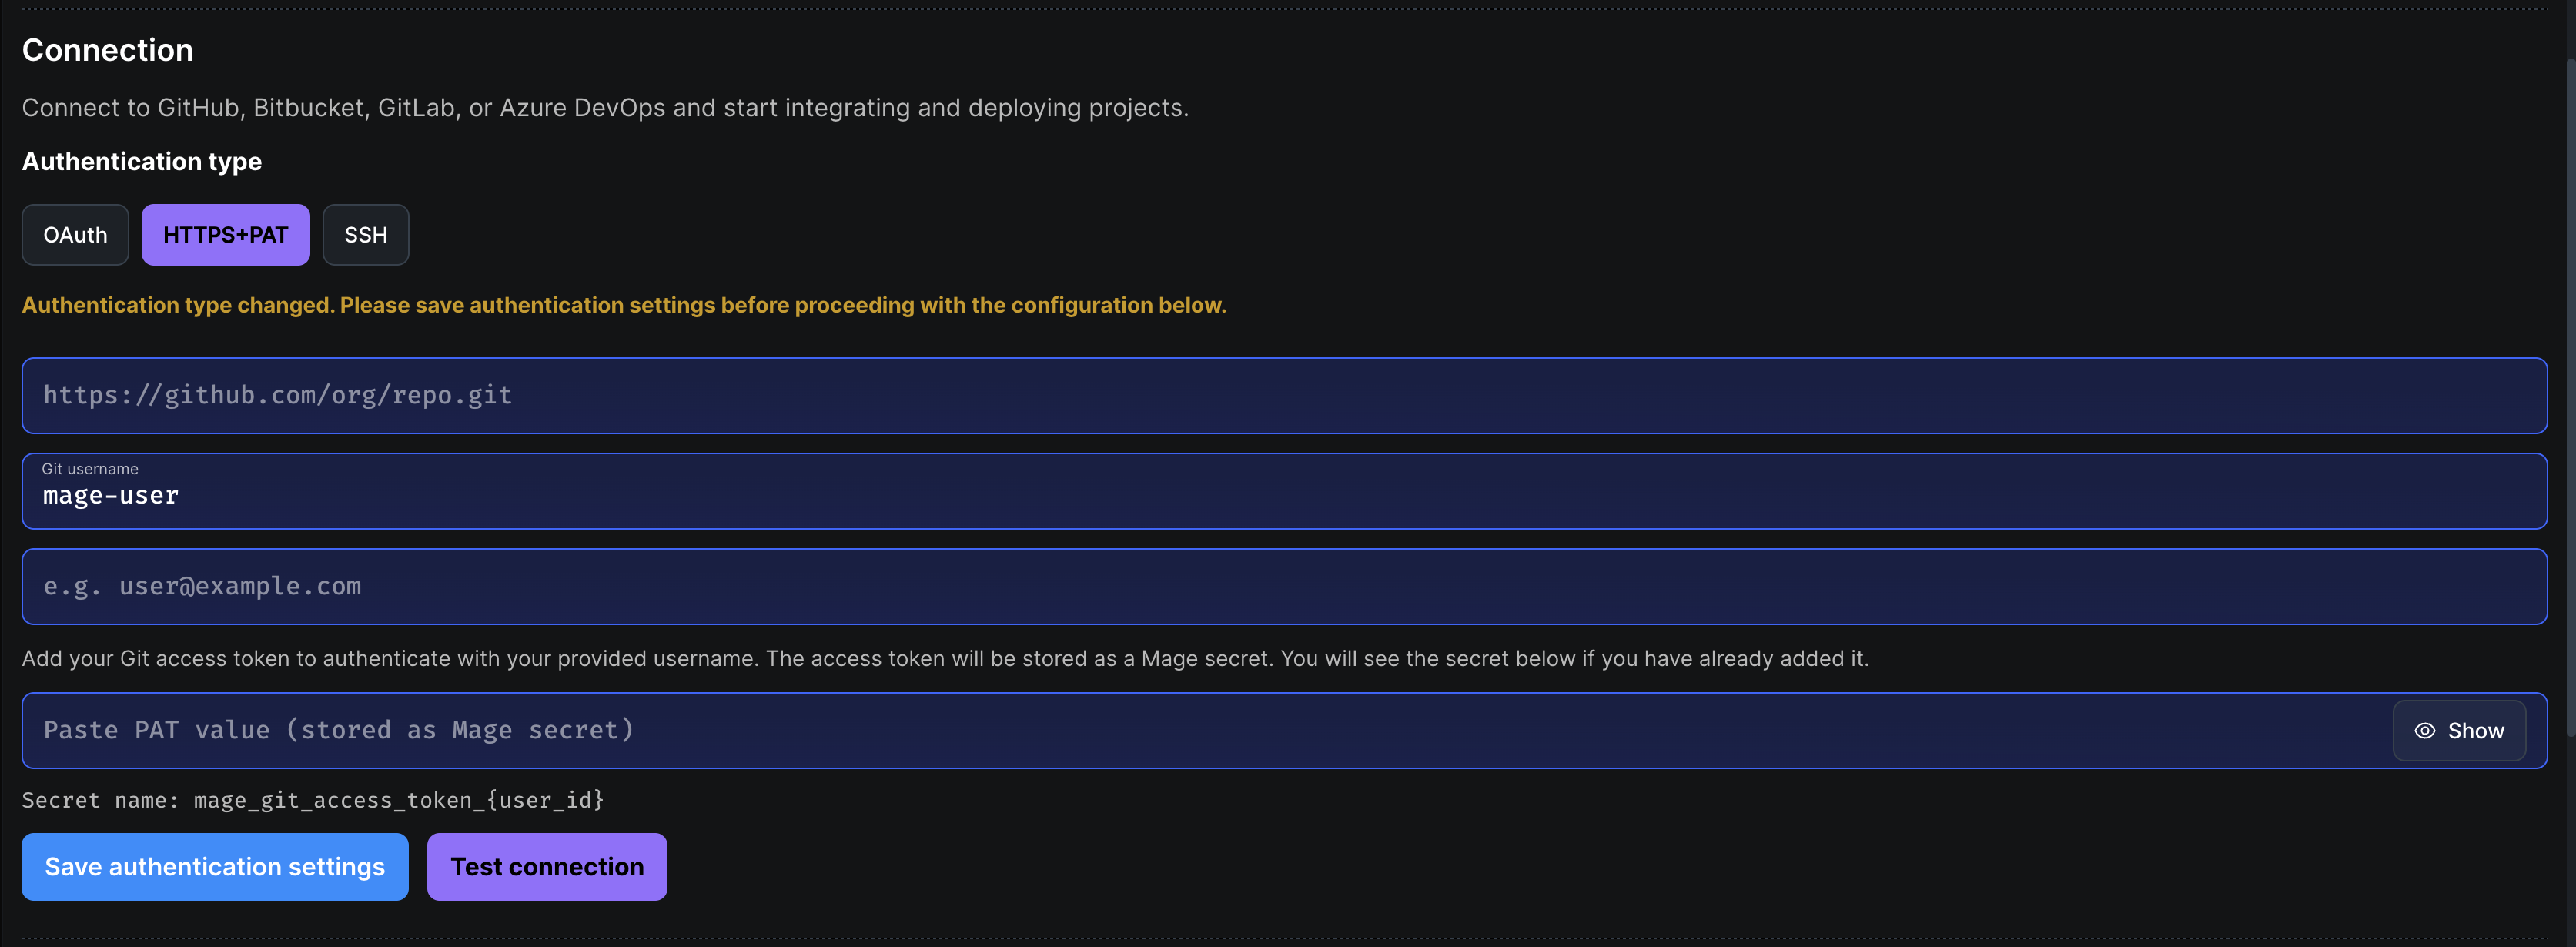
1. Under **Connection**, set **Authentication type** to **HTTPS+PAT**.
2. Enter the **remote repository URL** in HTTPS form (for example `https://github.com/your-org/your-repo.git`). The UI derives owner and repository name from this URL.
3. Enter a **username** and **email** for Git commit authorship. These are also used as HTTP credentials: the username is your Git host account name and the PAT is sent in place of a password.
4. In your Git host, create a **personal access token** (or app password) scoped to at least **clone, fetch, and push**. Scope names differ by provider — for example, GitHub requires the `repo` scope; GitLab requires `read_repository` and `write_repository`; Bitbucket uses the `repository:write` permission.
5. Paste the token into **Personal access token** and click **Save authentication settings**. The token is stored as a **Mage secret** named `mage_git_access_token_{user_id}` (where `{user_id}` is your Mage user ID).
HTTPS+PAT uses your stored credentials for Git in the [version control terminal](#3-version-control-terminal) the same way OAuth does.
After clicking **Save settings**, proceed to the **Connection** section below to set your authentication type and connect your provider.
### HTTPS and personal access token (PAT)
1. Under **Connection**, set **Authentication type** to **HTTPS+PAT**.
2. Enter the **remote repository URL** in HTTPS form (for example `https://github.com/your-org/your-repo.git`). The UI derives owner and repository name from this URL.
3. Enter a **username** and **email** for Git commit authorship. These are also used as HTTP credentials: the username is your Git host account name and the PAT is sent in place of a password.
4. In your Git host, create a **personal access token** (or app password) scoped to at least **clone, fetch, and push**. Scope names differ by provider — for example, GitHub requires the `repo` scope; GitLab requires `read_repository` and `write_repository`; Bitbucket uses the `repository:write` permission.
5. Paste the token into **Personal access token** and click **Save authentication settings**. The token is stored as a **Mage secret** named `mage_git_access_token_{user_id}` (where `{user_id}` is your Mage user ID).
HTTPS+PAT uses your stored credentials for Git in the [version control terminal](#3-version-control-terminal) the same way OAuth does.
 ### SSH key authentication
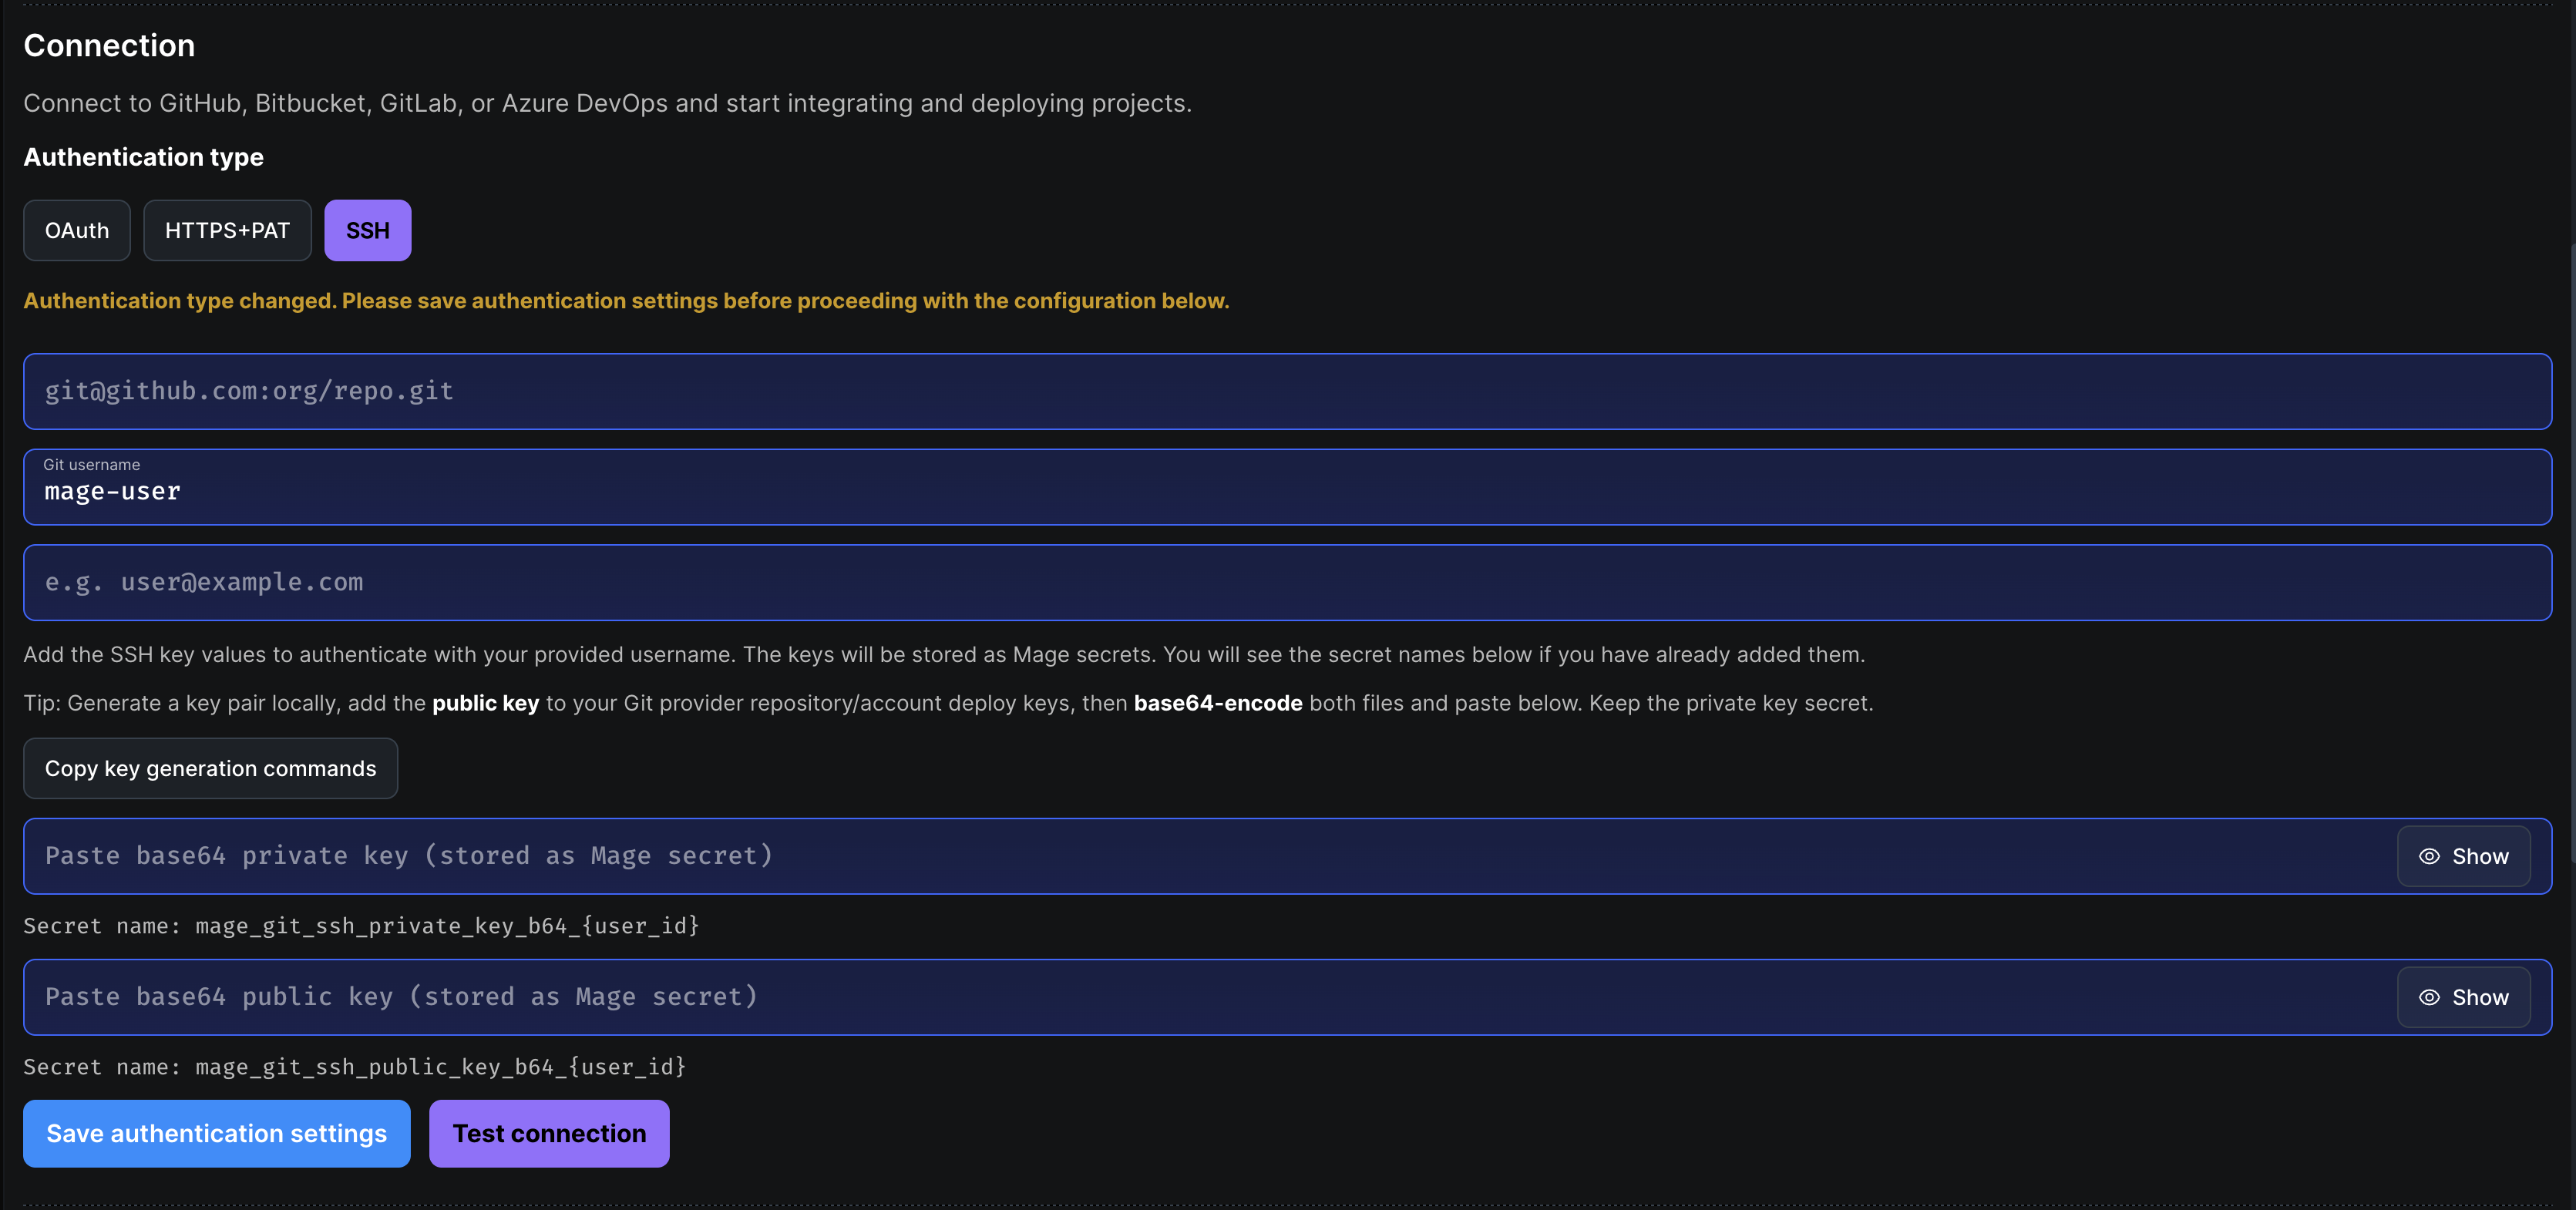
1. Under **Connection**, set **Authentication type** to **SSH**.
2. Enter the **remote repository URL** in SSH form (for example `git@github.com:your-org/your-repo.git` or a supported `ssh://` URL from your provider).
3. Enter a **username** and **email** for Git **commit** identity (as shown in `git log`), matching what you use for the repository.
4. Add **SSH public and private key** values. The form expects the key material in **base64** (as labeled in the UI). In your Git host, add the public key as a **deploy key** (repo-scoped) or a user key, with permission to read/write the repo as needed.
5. Click **Save authentication settings**.
With **SSH** authentication, Mage cannot use the provider’s **Git hosting API** for some deployment flows the same way as with OAuth (for example, **listing commits in the Deployments** UI). For **`git push`**, **`git pull`**, fetches, and other Git wire operations, use the **[version control terminal](#access-the-version-control-terminal)**. A warning is shown in the app when this applies.
### SSH key authentication
1. Under **Connection**, set **Authentication type** to **SSH**.
2. Enter the **remote repository URL** in SSH form (for example `git@github.com:your-org/your-repo.git` or a supported `ssh://` URL from your provider).
3. Enter a **username** and **email** for Git **commit** identity (as shown in `git log`), matching what you use for the repository.
4. Add **SSH public and private key** values. The form expects the key material in **base64** (as labeled in the UI). In your Git host, add the public key as a **deploy key** (repo-scoped) or a user key, with permission to read/write the repo as needed.
5. Click **Save authentication settings**.
With **SSH** authentication, Mage cannot use the provider’s **Git hosting API** for some deployment flows the same way as with OAuth (for example, **listing commits in the Deployments** UI). For **`git push`**, **`git pull`**, fetches, and other Git wire operations, use the **[version control terminal](#access-the-version-control-terminal)**. A warning is shown in the app when this applies.
 ### GitHub (OAuth)
Mage Pro supports integration with GitHub repositories for version control, collaboration, and deployments. For **HTTPS+PAT** or **SSH**, use [PAT](#https-and-personal-access-token-pat) or [SSH key](#ssh-key-authentication) instead of the GitHub **Connect** OAuth flow below.
**Connect to GitHub using OAuth tokens:**
**Step 1**: Click the **Connect** button to the right of the GitHub connection.
* This will take you to the GitHub sign-in authentication.
### GitHub (OAuth)
Mage Pro supports integration with GitHub repositories for version control, collaboration, and deployments. For **HTTPS+PAT** or **SSH**, use [PAT](#https-and-personal-access-token-pat) or [SSH key](#ssh-key-authentication) instead of the GitHub **Connect** OAuth flow below.
**Connect to GitHub using OAuth tokens:**
**Step 1**: Click the **Connect** button to the right of the GitHub connection.
* This will take you to the GitHub sign-in authentication.
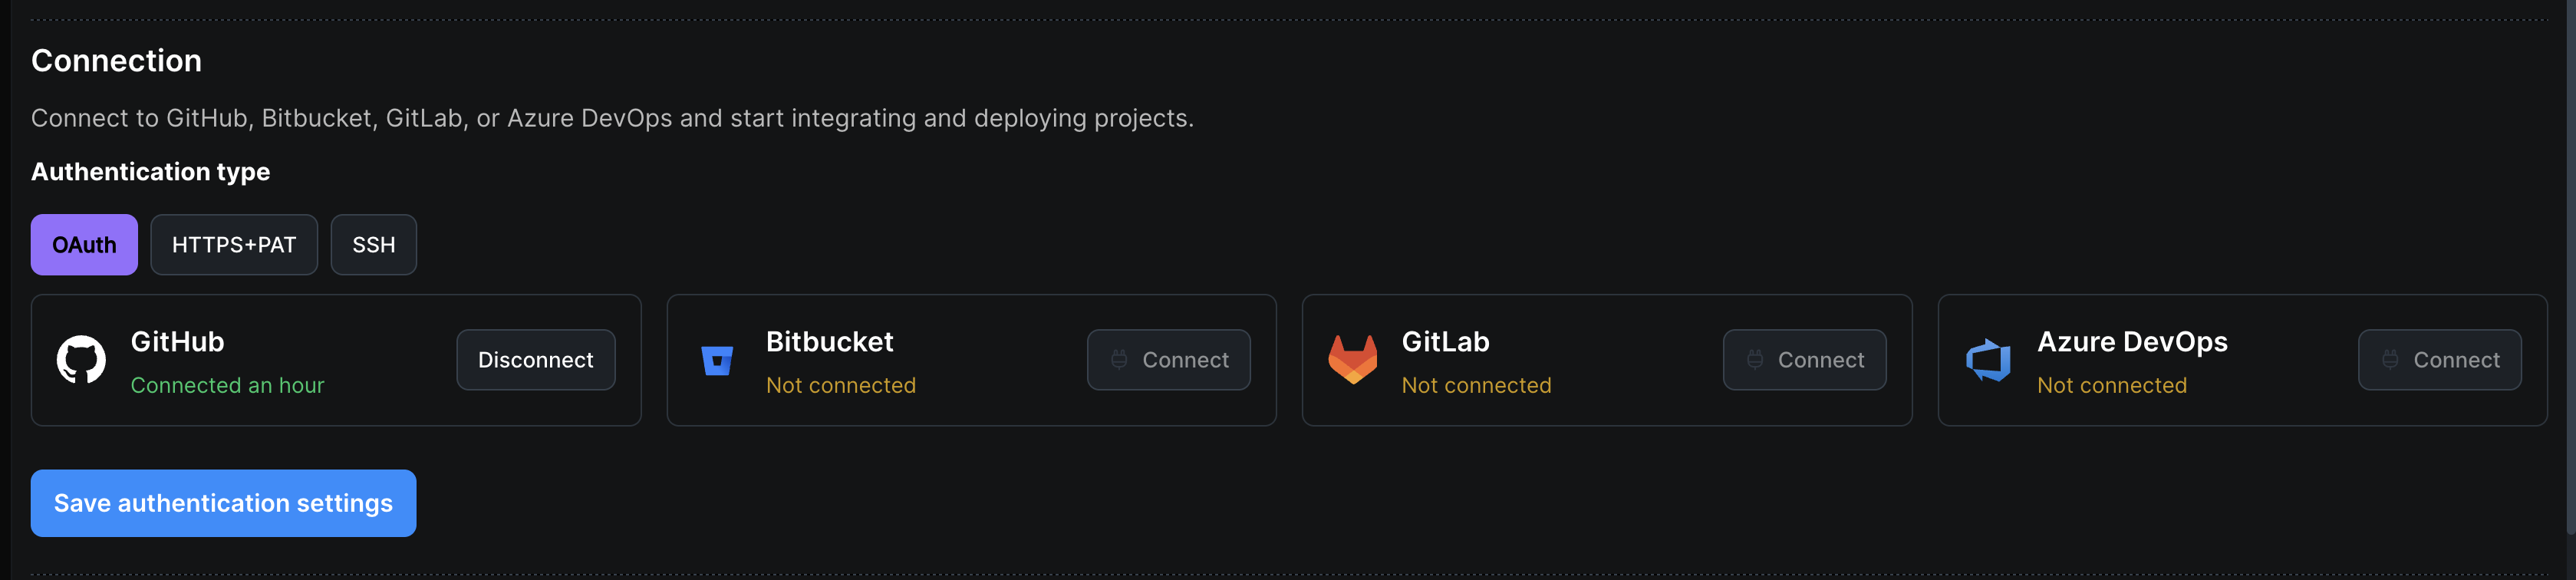 **Step 2**: Sign in with your GitHub login credentials.
* After authenticating you will return to the Mage Pro deployment app.
* You should now see that you are connected to GitHub.
* Click **Save authentication settings**.
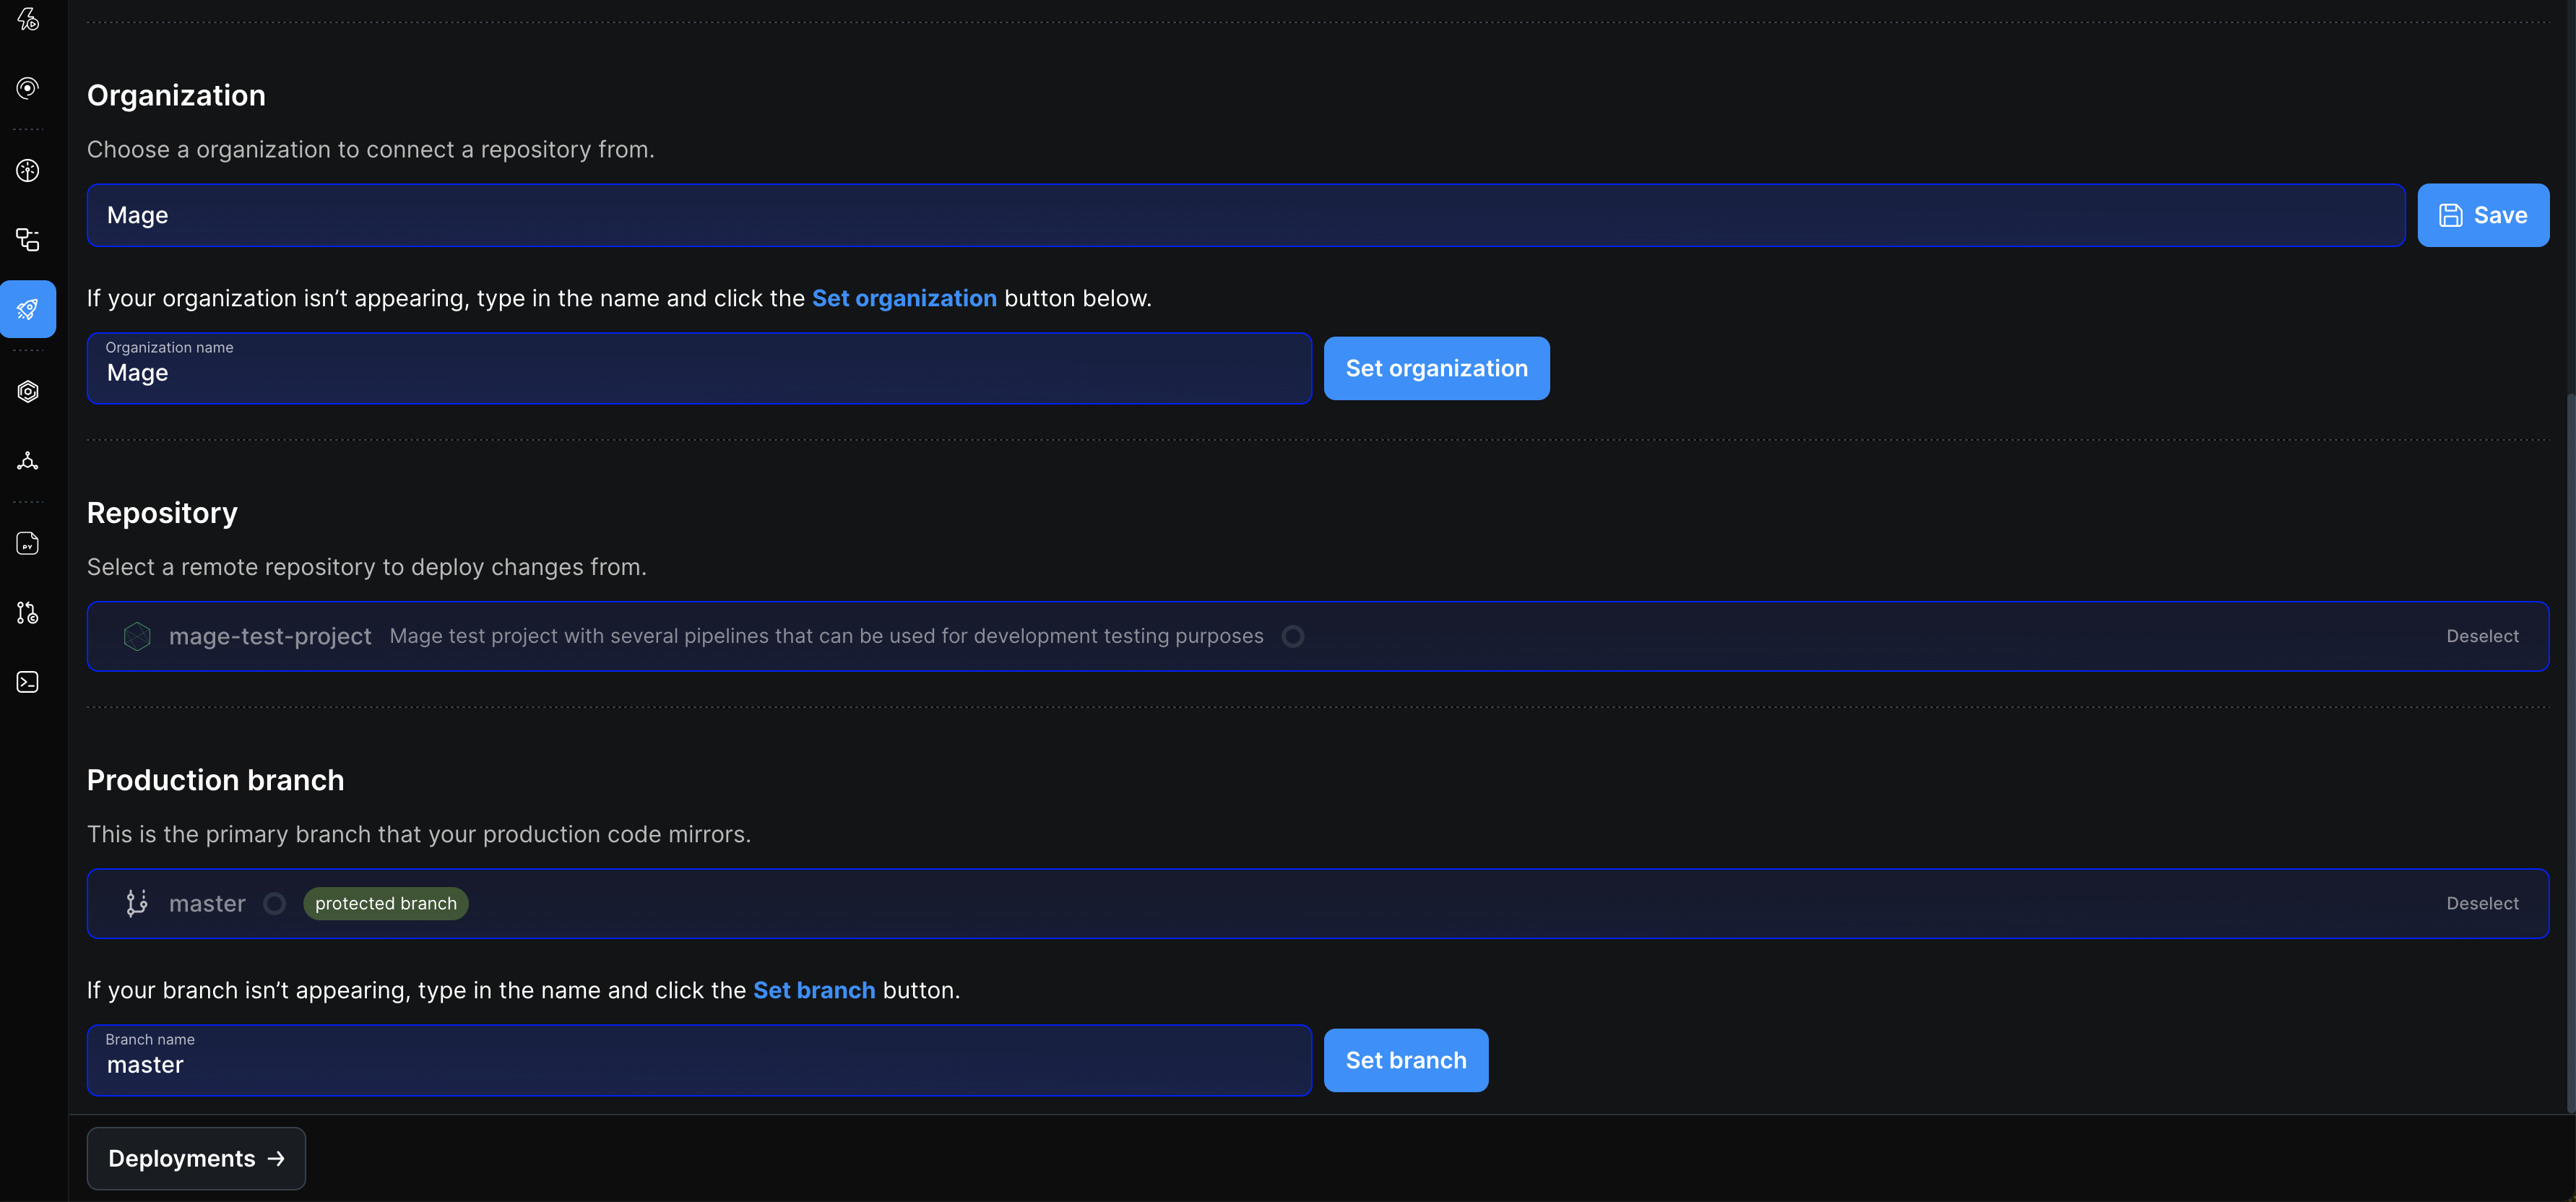
**Step 3**: Select your GitHub organization from the list.
* If your organization isn't appearing, enter the name in the **Organization name** field and click **Set organization**.
To deploy from a **private repository**, click the **Install Mage Pro app on GitHub** button that appears below the Organization section. Once installed, you can verify or update the installation at any time using the **Verify installation** or **Configure installation settings** buttons.
**Step 4**: Select the repository from the dropdown.
* You should see all your GitHub repositories if you authenticated correctly.
**Step 5**: Select the production branch from the dropdown.
* The production branch is the primary branch your production code will mirror.
**Step 2**: Sign in with your GitHub login credentials.
* After authenticating you will return to the Mage Pro deployment app.
* You should now see that you are connected to GitHub.
* Click **Save authentication settings**.
**Step 3**: Select your GitHub organization from the list.
* If your organization isn't appearing, enter the name in the **Organization name** field and click **Set organization**.
To deploy from a **private repository**, click the **Install Mage Pro app on GitHub** button that appears below the Organization section. Once installed, you can verify or update the installation at any time using the **Verify installation** or **Configure installation settings** buttons.
**Step 4**: Select the repository from the dropdown.
* You should see all your GitHub repositories if you authenticated correctly.
**Step 5**: Select the production branch from the dropdown.
* The production branch is the primary branch your production code will mirror.
 ### Bitbucket (OAuth)
Mage Pro supports integration with Bitbucket repositories for version control, collaboration, and deployments. For **HTTPS+PAT** or **SSH**, use [PAT](#https-and-personal-access-token-pat) or [SSH key](#ssh-key-authentication) instead of the Bitbucket **Connect** OAuth flow below.
**Connect to Bitbucket using OAuth tokens:**
#### GitHub Authentication
**Step 1**: Click the "Connect" button to the right of the GitHub connection
* This will take you to the GitHub sign-in authentication
**Step 2**: Sign in with your GitHub login credentials
* After authenticating you will return to the Mage-Pro deployment app
* You should now see that you are connected to GitHub
**Step 3**: Select your GitHub organization from the dropdown list.
* If there are no organizations listed, add an organization to the text field below and click the Set organization button
**Step 4**: Select the repo you want to commit code to by clicking the repository drop down box
* You should see all your GitHub repos here if you authenticated correctly
**Step 5**: Select your branch (usually main or master) to commit your code to by clicking the dropdown box and selecting the branch name
**Step 6**: Click the "Deployments" button to see a list of commits from your Git hosting vendor, and deploy from the most recent or any specific commit.
If you need to connect deployments to a private GitHub repo, provide an organization then click the Install Mage Pro app on GitHub button.
#### BitBucket Authentication
Mage Pro supports integration with BitBucket repositories for version control, collaboration, and deployments.
**Connect to BitBucket using OAuth tokens:**
**Step 1**: Set your directory as the user code path you intend to use for your project.
* In Mage Pro the default directory will be `/home/src/default_repo`.
* If you changed the `USER_CODE_PATH` environment variable in the Mage Cloud Management Portal, your directory will need to reflect that change.
### Bitbucket (OAuth)
Mage Pro supports integration with Bitbucket repositories for version control, collaboration, and deployments. For **HTTPS+PAT** or **SSH**, use [PAT](#https-and-personal-access-token-pat) or [SSH key](#ssh-key-authentication) instead of the Bitbucket **Connect** OAuth flow below.
**Connect to Bitbucket using OAuth tokens:**
#### GitHub Authentication
**Step 1**: Click the "Connect" button to the right of the GitHub connection
* This will take you to the GitHub sign-in authentication
**Step 2**: Sign in with your GitHub login credentials
* After authenticating you will return to the Mage-Pro deployment app
* You should now see that you are connected to GitHub
**Step 3**: Select your GitHub organization from the dropdown list.
* If there are no organizations listed, add an organization to the text field below and click the Set organization button
**Step 4**: Select the repo you want to commit code to by clicking the repository drop down box
* You should see all your GitHub repos here if you authenticated correctly
**Step 5**: Select your branch (usually main or master) to commit your code to by clicking the dropdown box and selecting the branch name
**Step 6**: Click the "Deployments" button to see a list of commits from your Git hosting vendor, and deploy from the most recent or any specific commit.
If you need to connect deployments to a private GitHub repo, provide an organization then click the Install Mage Pro app on GitHub button.
#### BitBucket Authentication
Mage Pro supports integration with BitBucket repositories for version control, collaboration, and deployments.
**Connect to BitBucket using OAuth tokens:**
**Step 1**: Set your directory as the user code path you intend to use for your project.
* In Mage Pro the default directory will be `/home/src/default_repo`.
* If you changed the `USER_CODE_PATH` environment variable in the Mage Cloud Management Portal, your directory will need to reflect that change.
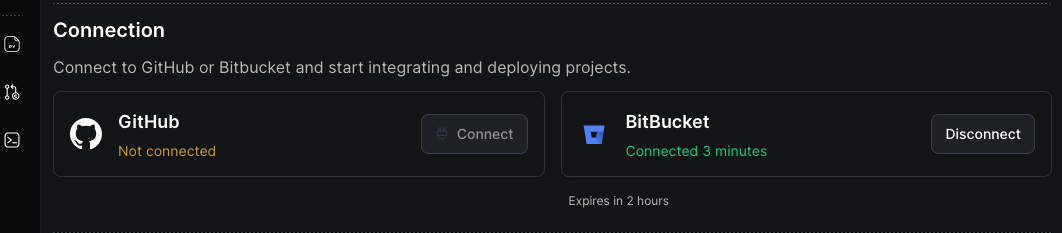
 **Step 1**: Click the **Connect** button to the right of the Bitbucket connection.
* This will take you to the Bitbucket sign-in authentication.
**Step 2**: Sign in with your Bitbucket login credentials.
* After authenticating you will return to the Mage Pro deployment app.
* You should now see that you are connected to Bitbucket.
* Click **Save authentication settings**.
**Step 2**: Click the "Connect" button to the right of the BitBucket connection
* This will take you to the BitBucket sign-in authentication
**Step 3**: Sign in with your BitBucket login credentials
* After authenticating you will return to the Mage-Pro deployment app
* You should now see that you are connected to BitBucket
**Step 1**: Click the **Connect** button to the right of the Bitbucket connection.
* This will take you to the Bitbucket sign-in authentication.
**Step 2**: Sign in with your Bitbucket login credentials.
* After authenticating you will return to the Mage Pro deployment app.
* You should now see that you are connected to Bitbucket.
* Click **Save authentication settings**.
**Step 2**: Click the "Connect" button to the right of the BitBucket connection
* This will take you to the BitBucket sign-in authentication
**Step 3**: Sign in with your BitBucket login credentials
* After authenticating you will return to the Mage-Pro deployment app
* You should now see that you are connected to BitBucket
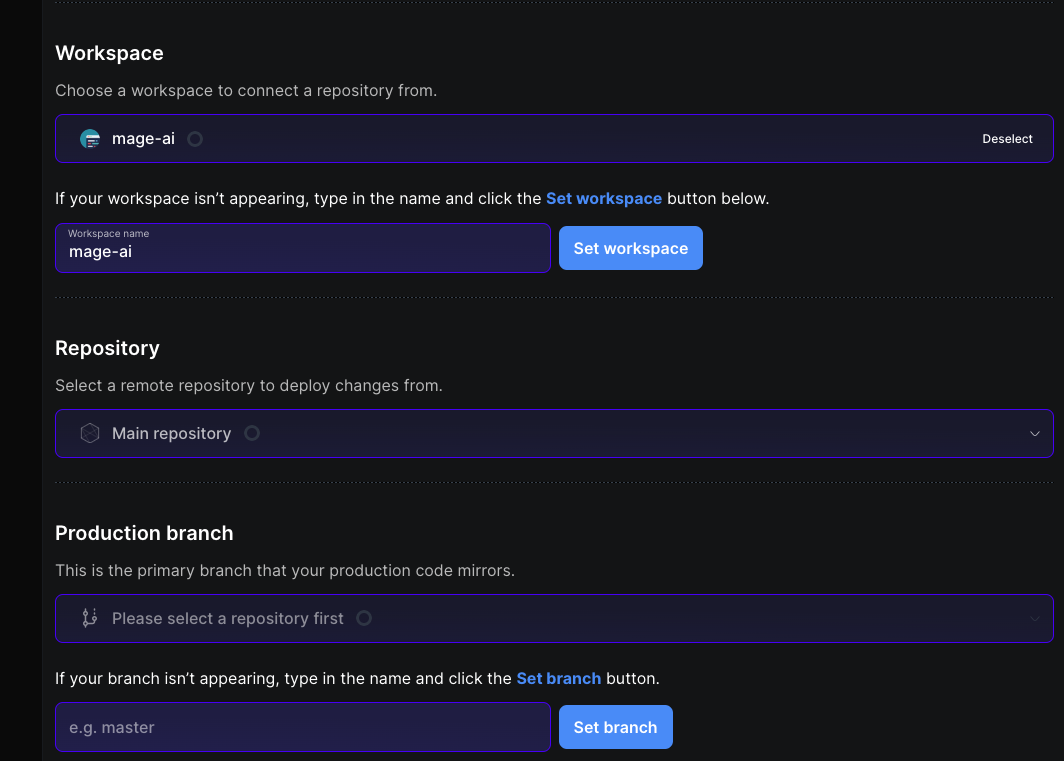
 **Step 3**: Select your Bitbucket workspace from the dropdown list.
* If there are no workspaces listed, enter a workspace slug in the text field below and click **Set workspace**.
**Step 4**: Select the repository from the dropdown menu.
* You should see a list of all the repositories in that workspace.
**Step 5**: Select the production branch from the dropdown list.
* The production branch is the primary branch your production code will mirror.
**Step 4**: Select your BitBucket workspace from the dropdown list.
* If there are no organizations listed, add an organization to the text field below and click the "Set organization" button
**Step 5**: Select the repository from the dropdown menu.
* You should see a list of all the repositories that were created in the workspace.
**Step 6**: Finally, select the production branch from the dropdown list
* The production branch is the primary branch that your production code will mirror.
**Step 3**: Select your Bitbucket workspace from the dropdown list.
* If there are no workspaces listed, enter a workspace slug in the text field below and click **Set workspace**.
**Step 4**: Select the repository from the dropdown menu.
* You should see a list of all the repositories in that workspace.
**Step 5**: Select the production branch from the dropdown list.
* The production branch is the primary branch your production code will mirror.
**Step 4**: Select your BitBucket workspace from the dropdown list.
* If there are no organizations listed, add an organization to the text field below and click the "Set organization" button
**Step 5**: Select the repository from the dropdown menu.
* You should see a list of all the repositories that were created in the workspace.
**Step 6**: Finally, select the production branch from the dropdown list
* The production branch is the primary branch that your production code will mirror.
 ### GitLab (OAuth)
Mage Pro supports integration with GitLab repositories for version control, collaboration, and deployments. For **HTTPS+PAT** or **SSH**, use [PAT](#https-and-personal-access-token-pat) or [SSH key](#ssh-key-authentication) instead of the **Connect** GitLab OAuth flow below.
**Connect to GitLab using OAuth tokens:**
**Step 1**: Click the **Connect** button to the right of the GitLab connection.
* This will take you to the GitLab sign-in authentication.
**Step 2**: Sign in with your GitLab login credentials.
* After authenticating you will return to the Mage Pro deployment app.
* You should now see that you are connected to GitLab.
* Click **Save authentication settings**.
### GitLab (OAuth)
Mage Pro supports integration with GitLab repositories for version control, collaboration, and deployments. For **HTTPS+PAT** or **SSH**, use [PAT](#https-and-personal-access-token-pat) or [SSH key](#ssh-key-authentication) instead of the **Connect** GitLab OAuth flow below.
**Connect to GitLab using OAuth tokens:**
**Step 1**: Click the **Connect** button to the right of the GitLab connection.
* This will take you to the GitLab sign-in authentication.
**Step 2**: Sign in with your GitLab login credentials.
* After authenticating you will return to the Mage Pro deployment app.
* You should now see that you are connected to GitLab.
* Click **Save authentication settings**.
 **Step 3**: Select your GitLab group from the dropdown list.
* If there are no groups listed, enter a group name in the text field below and click **Set group**.
**Step 4**: Select the repository from the dropdown menu.
* You should see a list of all the repositories in that group.
**Step 5**: Select the production branch from the dropdown list.
* The production branch is the primary branch your production code will mirror.
### Azure DevOps (OAuth)
Mage Pro supports integration with Azure DevOps repositories for version control, collaboration, and deployments. For **HTTPS+PAT** or **SSH**, use [PAT](#https-and-personal-access-token-pat) or [SSH key](#ssh-key-authentication) instead of the Azure DevOps **Connect** OAuth flow below.
**Connect to Azure DevOps using OAuth tokens:**
**Step 1**: Click the **Connect** button to the right of the Azure DevOps connection.
* This will take you to the Azure DevOps sign-in authentication.
**Step 2**: Sign in with your Azure DevOps credentials.
* After authenticating you will return to the Mage Pro deployment app.
* You should now see that you are connected to Azure DevOps.
* Click **Save authentication settings**.
**Step 3**: Select your GitLab group from the dropdown list.
* If there are no groups listed, enter a group name in the text field below and click **Set group**.
**Step 4**: Select the repository from the dropdown menu.
* You should see a list of all the repositories in that group.
**Step 5**: Select the production branch from the dropdown list.
* The production branch is the primary branch your production code will mirror.
### Azure DevOps (OAuth)
Mage Pro supports integration with Azure DevOps repositories for version control, collaboration, and deployments. For **HTTPS+PAT** or **SSH**, use [PAT](#https-and-personal-access-token-pat) or [SSH key](#ssh-key-authentication) instead of the Azure DevOps **Connect** OAuth flow below.
**Connect to Azure DevOps using OAuth tokens:**
**Step 1**: Click the **Connect** button to the right of the Azure DevOps connection.
* This will take you to the Azure DevOps sign-in authentication.
**Step 2**: Sign in with your Azure DevOps credentials.
* After authenticating you will return to the Mage Pro deployment app.
* You should now see that you are connected to Azure DevOps.
* Click **Save authentication settings**.
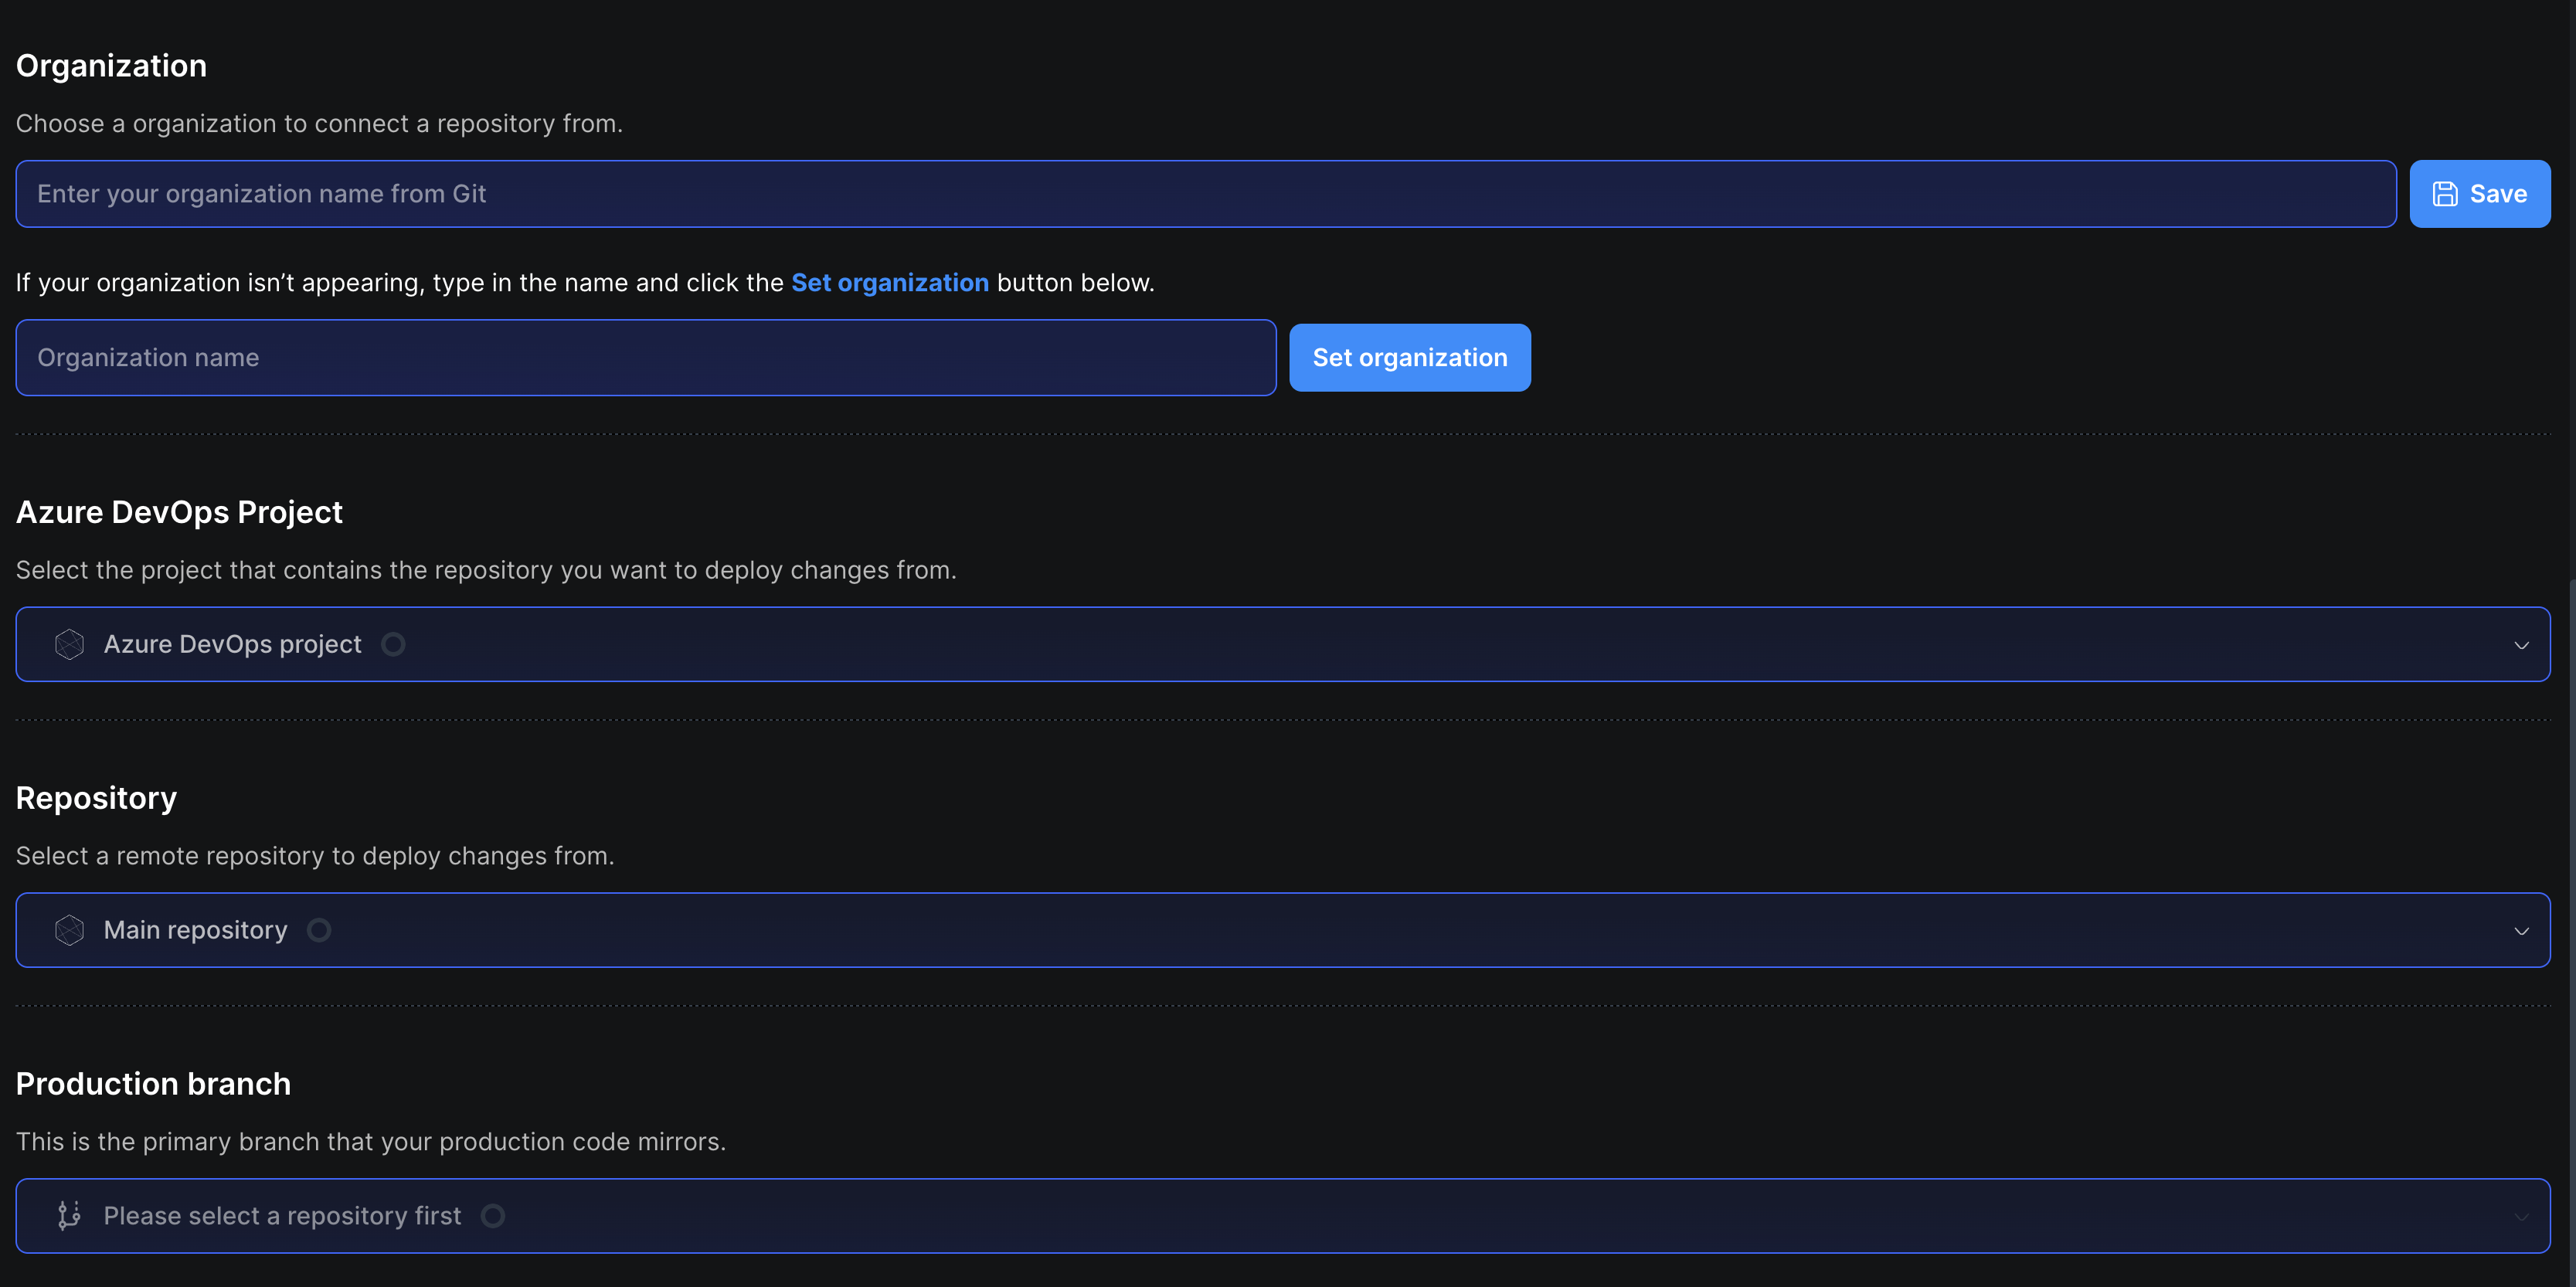 **Step 3**: Select your Azure DevOps **organization** from the dropdown, or type the organization name directly in the text field and click **Save**.
* If your organization isn't appearing in the dropdown, enter the name in the **Organization name** field and click **Set organization**.
**Step 4**: Select your **Azure DevOps project** from the dropdown.
* This is the project that contains the repository you want to deploy changes from.
**Step 5**: Select the **repository** from the dropdown.
* You should see a list of all repositories in that project.
**Step 6**: Select the **production branch** from the dropdown.
* This is the primary branch your production code will mirror.
* If your branch isn't listed, type the branch name into the text field and click **Set branch**.
## 2. Deployments App
The Deployments app is the control surface for [deploying](#merge-pull-request-and-deploy) merged work from Git to your Mage Pro cluster. It assumes you have already completed [authentication](#1-authentication).
### Merge pull request and deploy
Once you push code to your Git branch, open your Git provider and merge the pull request. When the merge is done, the deployment is available in the Deployments app.
Mage then deploys a chosen commit to your environment:
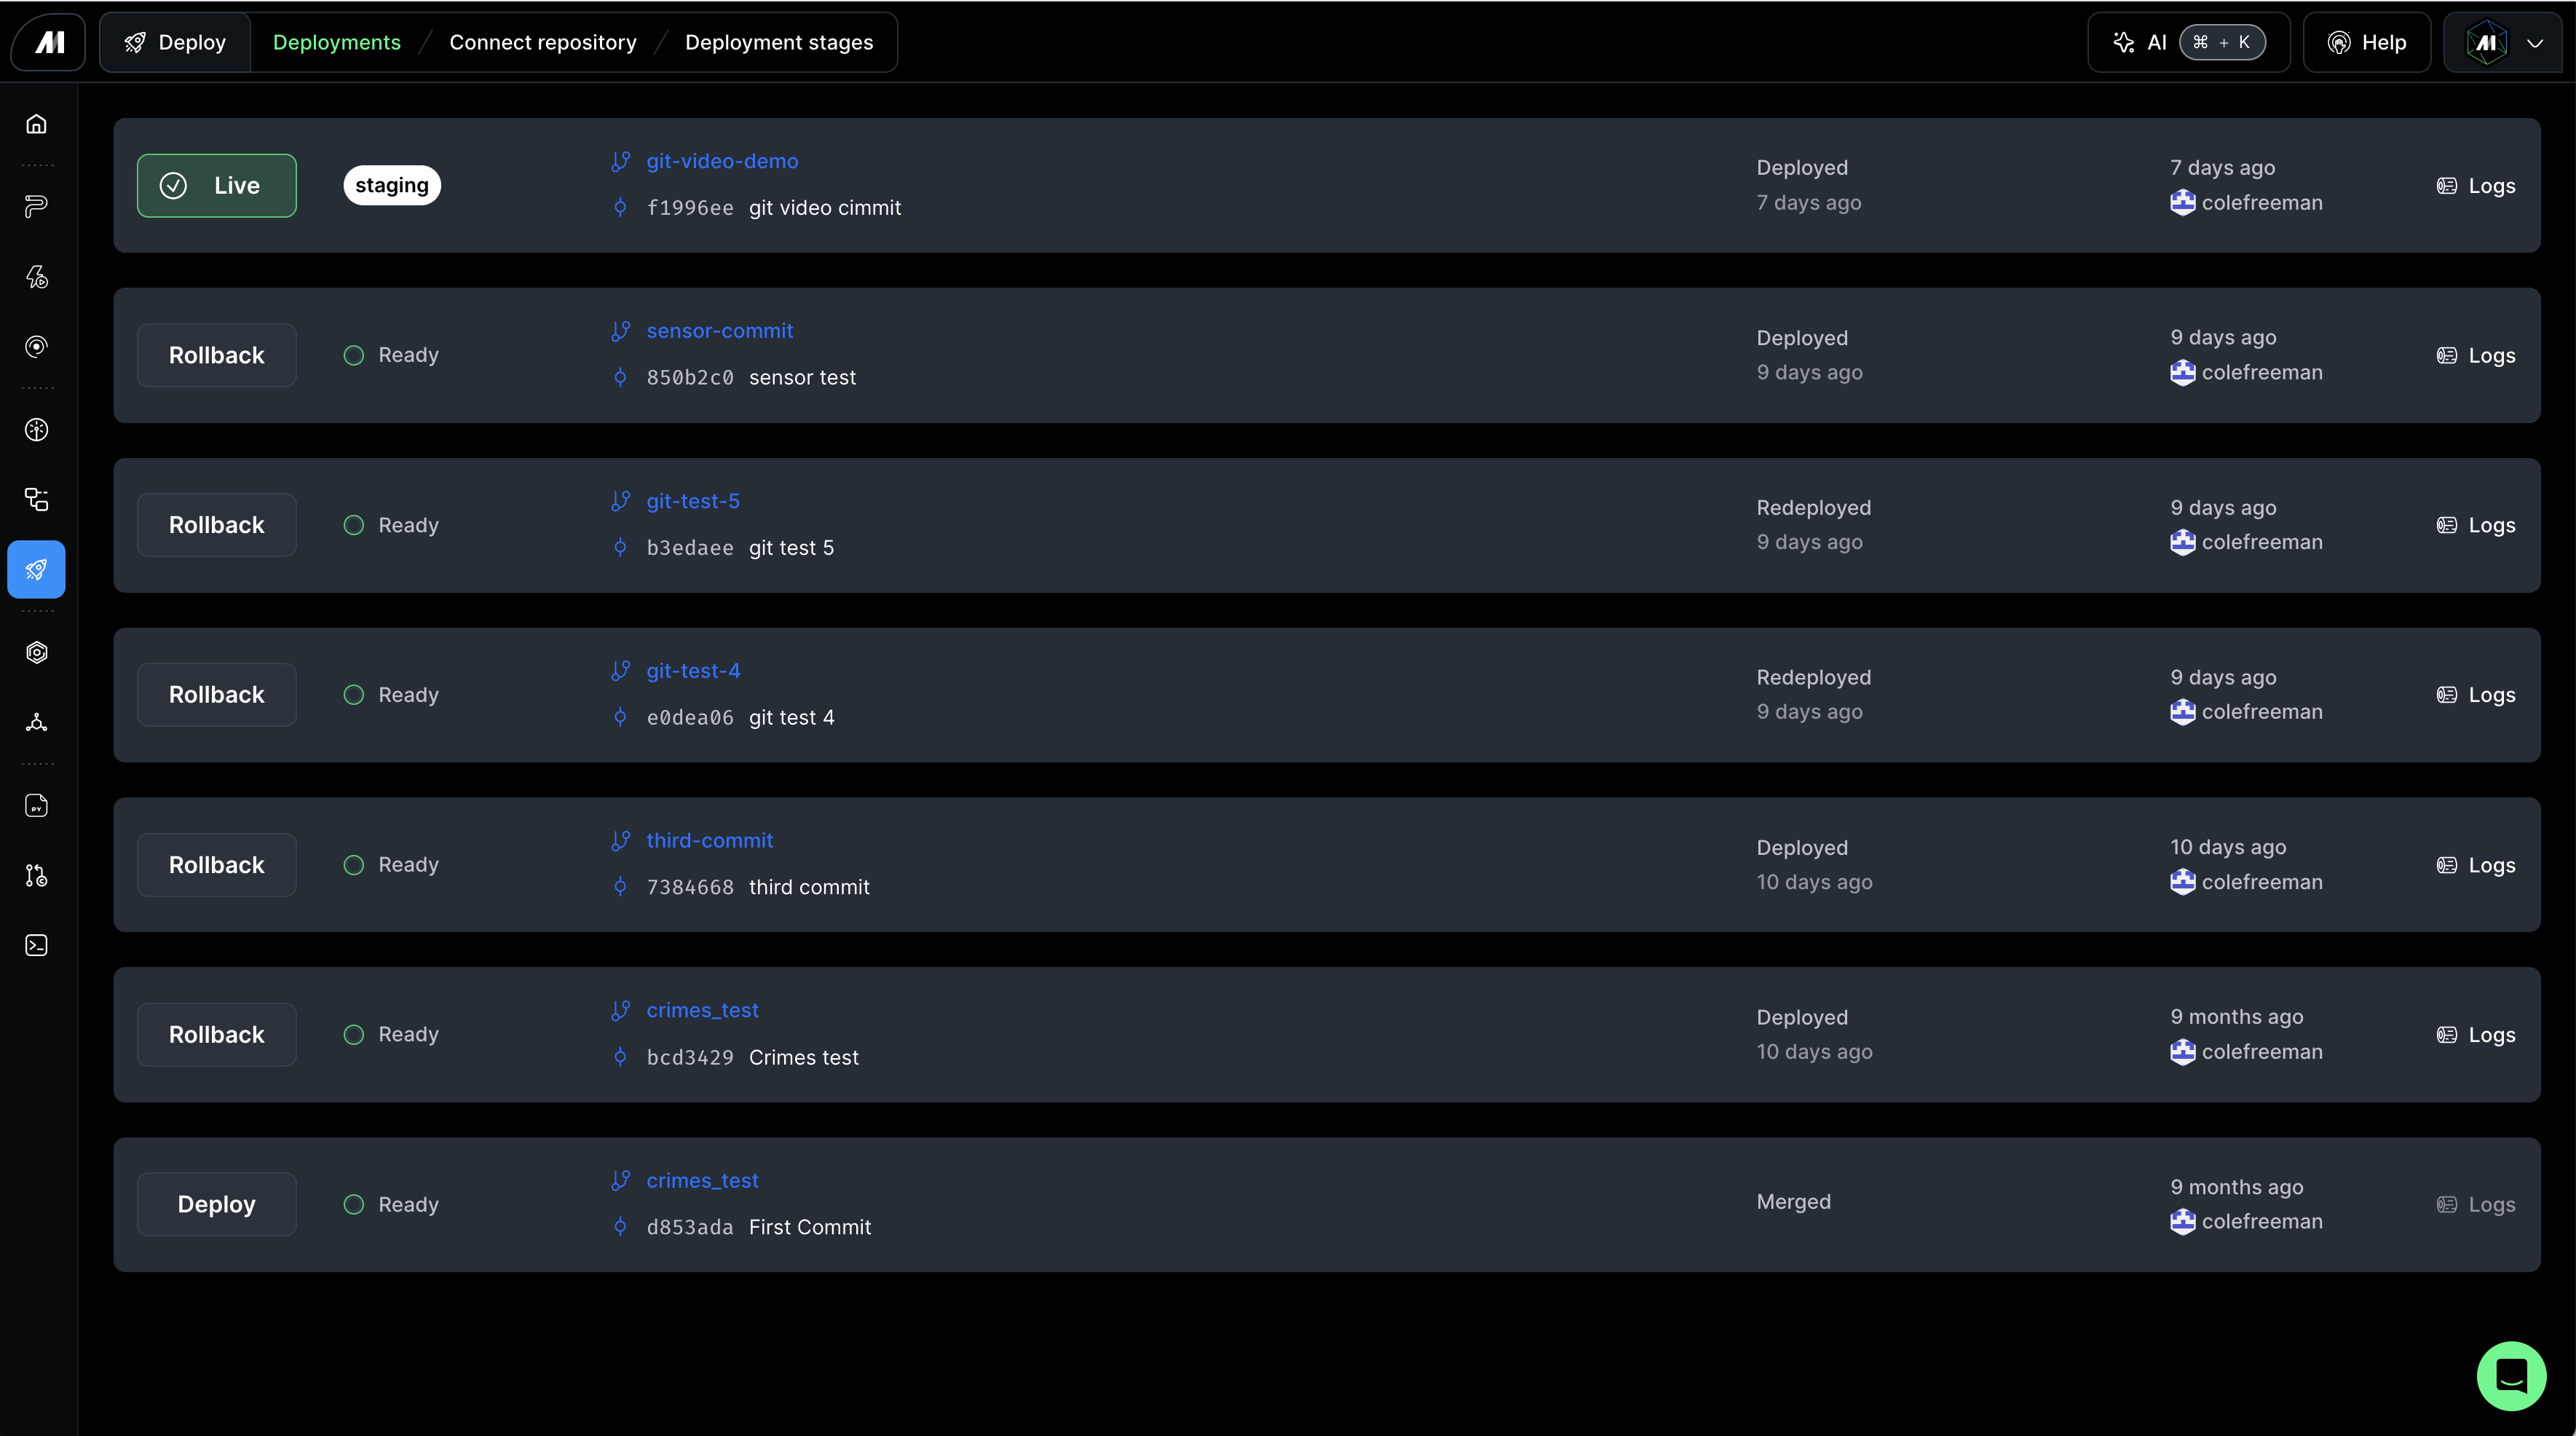
1. In Mage, go to the **Deployments** view and open the deployments list (highlighted in green at the top when updates are available).
2. Click **Deploy** to ship the version you just merged. Use **Rollback** to deploy an earlier commit if you need to revert.
#### GitLab Authentication
Mage Pro supports integration with GitLab repositories for version control, collaboration, and deployments.
**Connect to GitLab using OAuth tokens:**
**Step 1**: Set your directory as the user code path you intend to use for your project.
* In Mage Pro the default directory will be `/home/src/default_repo`.
* If you changed the `USER_CODE_PATH` environment variable in the Mage Cloud Management Portal, your directory will need to reflect that change.
**Step 2**: Click the "Connect" button to the right of the GitLab connection
* This will take you to the GitLab sign-in authentication
**Step 3**: Sign in with your GitLab login credentials
* After authenticating you will return to the Mage-Pro deployment app
* You should now see that you are connected to GitLab
**Step 4**: Select your GitLab group from the dropdown list.
* If there are no groups listed, add a group to the text field below and click the "Set group" button
**Step 5**: Select the repository from the dropdown menu.
* You should see a list of all the repositories that were created in the group.
**Step 6**: Finally, select the production branch from the dropdown list
* The production branch is the primary branch that your production code will mirror.
Currently the deployments application is only available for GitHub, GitLab, and Bitbucket users.
### 1.2 Deploy Code
Deploy code from Git commits to your Mage Pro cluster or workspace using the Deployments application.
#### Merge Pull Request
Once you push code to your Git branch, head to your Git provider and merge the pull request. Once the pull request is merged your deployment will be available in the deployments application interface.
#### Deploy Code
Mage simplifies the deployment of code to production pipelines. Follow these steps to deploy your pipeline's CI/CD Git branches:
1. Once you have merged the pull request in your Git provider, navigate back to the deployments tab and click deployments highlighted in green in the top
2. Click the Deploy button to deploy the current version you just merged
* To revert to a previous version, simply click the "Rollback" button to deploy the desired version.
**Step 3**: Select your Azure DevOps **organization** from the dropdown, or type the organization name directly in the text field and click **Save**.
* If your organization isn't appearing in the dropdown, enter the name in the **Organization name** field and click **Set organization**.
**Step 4**: Select your **Azure DevOps project** from the dropdown.
* This is the project that contains the repository you want to deploy changes from.
**Step 5**: Select the **repository** from the dropdown.
* You should see a list of all repositories in that project.
**Step 6**: Select the **production branch** from the dropdown.
* This is the primary branch your production code will mirror.
* If your branch isn't listed, type the branch name into the text field and click **Set branch**.
## 2. Deployments App
The Deployments app is the control surface for [deploying](#merge-pull-request-and-deploy) merged work from Git to your Mage Pro cluster. It assumes you have already completed [authentication](#1-authentication).
### Merge pull request and deploy
Once you push code to your Git branch, open your Git provider and merge the pull request. When the merge is done, the deployment is available in the Deployments app.
Mage then deploys a chosen commit to your environment:
1. In Mage, go to the **Deployments** view and open the deployments list (highlighted in green at the top when updates are available).
2. Click **Deploy** to ship the version you just merged. Use **Rollback** to deploy an earlier commit if you need to revert.
#### GitLab Authentication
Mage Pro supports integration with GitLab repositories for version control, collaboration, and deployments.
**Connect to GitLab using OAuth tokens:**
**Step 1**: Set your directory as the user code path you intend to use for your project.
* In Mage Pro the default directory will be `/home/src/default_repo`.
* If you changed the `USER_CODE_PATH` environment variable in the Mage Cloud Management Portal, your directory will need to reflect that change.
**Step 2**: Click the "Connect" button to the right of the GitLab connection
* This will take you to the GitLab sign-in authentication
**Step 3**: Sign in with your GitLab login credentials
* After authenticating you will return to the Mage-Pro deployment app
* You should now see that you are connected to GitLab
**Step 4**: Select your GitLab group from the dropdown list.
* If there are no groups listed, add a group to the text field below and click the "Set group" button
**Step 5**: Select the repository from the dropdown menu.
* You should see a list of all the repositories that were created in the group.
**Step 6**: Finally, select the production branch from the dropdown list
* The production branch is the primary branch that your production code will mirror.
Currently the deployments application is only available for GitHub, GitLab, and Bitbucket users.
### 1.2 Deploy Code
Deploy code from Git commits to your Mage Pro cluster or workspace using the Deployments application.
#### Merge Pull Request
Once you push code to your Git branch, head to your Git provider and merge the pull request. Once the pull request is merged your deployment will be available in the deployments application interface.
#### Deploy Code
Mage simplifies the deployment of code to production pipelines. Follow these steps to deploy your pipeline's CI/CD Git branches:
1. Once you have merged the pull request in your Git provider, navigate back to the deployments tab and click deployments highlighted in green in the top
2. Click the Deploy button to deploy the current version you just merged
* To revert to a previous version, simply click the "Rollback" button to deploy the desired version.
 ## 3. Version control terminal
Once you have completed [Authentication](#1-authentication), you can use standard Git in the browser: status, commit, push, pull, and branch operations against your configured remote.
If you have not set up Git access yet, follow [Authentication](#1-authentication) first: **OAuth**, or **HTTPS+PAT** / **SSH** in the **Deployments** connection settings. All three options enable the version control terminal.
With **OAuth**, the terminal automatically attaches a session-scoped Git credential helper for the connected repository's provider. HTTPS Git commands can use the OAuth token that is already connected in Mage, so you do not need to run a separate provider CLI login in the terminal.
Mage Pro images include GitHub CLI (`gh`) for optional GitHub auth helper and status checks. GitLab, Azure DevOps, and Bitbucket Git operations use the Mage credential helper or configured SSH/PAT authentication and do not require provider-specific CLIs in the runtime image.
### Access the Git terminal
* From the home page, open the left navigation and select **Terminal**.
* When the page loads, type Git commands in the terminal and press **Enter** to run them.
* If the terminal header shows **Authenticate Git**, Mage has not detected usable Git authentication for the repository. Select it to open the repository connection page for the current project, complete Git OAuth in Deployments, and then return to the terminal. If you authenticate Git directly in the terminal, Mage hides the action after it detects that Git authentication is available.
* Use tabs to keep multiple shell sessions open. Each tab keeps its own terminal session and working directory, so closing one tab does not interrupt the other tabs.
* The terminal status row shows the active folder, Git branch, and working tree change counts. Autocomplete appears while typing and suggests shell commands, Git subcommands, files, folders, executable commands, and recent command history from the active working directory.
* Terminal prompt timestamps and shell commands use UTC by default. If **Display local timezone** is enabled for the workspace, new terminal sessions use your browser's local IANA timezone for the prompt timestamp and the session `TZ` environment variable.
### Essential Git commands
* `git checkout -b `: create and switch to a new feature branch.
* `git status`: inspect modified, staged, and untracked files.
* `git add .`: stage changes in the current directory.
* `git commit -m ""`: commit the staged changes.
* `git pull`: fetch and merge remote changes into the current branch.
* `git push origin `: push the current branch to the remote repository.
## Best Practices for Environment Management
### Development Environment
* **Primary Tool - Version Control Terminal**:
* Create feature branches, develop code, commit changes, push to Git
* Switch between branches, merge changes
* **Secondary Tool - Deployments App**:
* Deploy to dev environment for testing and validation
* Rollback changes or switch to another feature branch (can also be done via terminal)
* **Workflow**: Develop in Mage Pro → Commit to feature branch → Deploy to dev environment for testing
* **Workflow**: Develop locally → Commit to feature branch → Deploy to dev environment for testing
### Staging Environment
* **Primary Tool - Deployments App**:
* Pull changes from Git (staging/main/master branch)
* Deploy to staging environment and run testing
* **Secondary Tool - Version Control Terminal**:
* Make hotfixes and push changes to Git
* Merge feature branches and prepare releases
* **Workflow**: Pull from Git → Deploy to staging → Run integration tests → Make hotfixes if needed
### Production Environment
* **Primary Tool - Deployments App**:
* Deploy commits from main/master branch
* Rollback changes if issues occur
* Monitor deployment status
* **Secondary Tool - Version Control Terminal**:
* Emergency patches and hotfixes only
* **Workflow**: Deploy from main/master → Monitor → Rollback if needed
## 3. Version control terminal
Once you have completed [Authentication](#1-authentication), you can use standard Git in the browser: status, commit, push, pull, and branch operations against your configured remote.
If you have not set up Git access yet, follow [Authentication](#1-authentication) first: **OAuth**, or **HTTPS+PAT** / **SSH** in the **Deployments** connection settings. All three options enable the version control terminal.
With **OAuth**, the terminal automatically attaches a session-scoped Git credential helper for the connected repository's provider. HTTPS Git commands can use the OAuth token that is already connected in Mage, so you do not need to run a separate provider CLI login in the terminal.
Mage Pro images include GitHub CLI (`gh`) for optional GitHub auth helper and status checks. GitLab, Azure DevOps, and Bitbucket Git operations use the Mage credential helper or configured SSH/PAT authentication and do not require provider-specific CLIs in the runtime image.
### Access the Git terminal
* From the home page, open the left navigation and select **Terminal**.
* When the page loads, type Git commands in the terminal and press **Enter** to run them.
* If the terminal header shows **Authenticate Git**, Mage has not detected usable Git authentication for the repository. Select it to open the repository connection page for the current project, complete Git OAuth in Deployments, and then return to the terminal. If you authenticate Git directly in the terminal, Mage hides the action after it detects that Git authentication is available.
* Use tabs to keep multiple shell sessions open. Each tab keeps its own terminal session and working directory, so closing one tab does not interrupt the other tabs.
* The terminal status row shows the active folder, Git branch, and working tree change counts. Autocomplete appears while typing and suggests shell commands, Git subcommands, files, folders, executable commands, and recent command history from the active working directory.
* Terminal prompt timestamps and shell commands use UTC by default. If **Display local timezone** is enabled for the workspace, new terminal sessions use your browser's local IANA timezone for the prompt timestamp and the session `TZ` environment variable.
### Essential Git commands
* `git checkout -b `: create and switch to a new feature branch.
* `git status`: inspect modified, staged, and untracked files.
* `git add .`: stage changes in the current directory.
* `git commit -m ""`: commit the staged changes.
* `git pull`: fetch and merge remote changes into the current branch.
* `git push origin `: push the current branch to the remote repository.
## Best Practices for Environment Management
### Development Environment
* **Primary Tool - Version Control Terminal**:
* Create feature branches, develop code, commit changes, push to Git
* Switch between branches, merge changes
* **Secondary Tool - Deployments App**:
* Deploy to dev environment for testing and validation
* Rollback changes or switch to another feature branch (can also be done via terminal)
* **Workflow**: Develop in Mage Pro → Commit to feature branch → Deploy to dev environment for testing
* **Workflow**: Develop locally → Commit to feature branch → Deploy to dev environment for testing
### Staging Environment
* **Primary Tool - Deployments App**:
* Pull changes from Git (staging/main/master branch)
* Deploy to staging environment and run testing
* **Secondary Tool - Version Control Terminal**:
* Make hotfixes and push changes to Git
* Merge feature branches and prepare releases
* **Workflow**: Pull from Git → Deploy to staging → Run integration tests → Make hotfixes if needed
### Production Environment
* **Primary Tool - Deployments App**:
* Deploy commits from main/master branch
* Rollback changes if issues occur
* Monitor deployment status
* **Secondary Tool - Version Control Terminal**:
* Emergency patches and hotfixes only
* **Workflow**: Deploy from main/master → Monitor → Rollback if needed